![]()
![]() Many developers require MySQL on their Macs, but if you’ve tried to install MySQL in OS X El Capitan and Yosemite, you likely noticed that you’ll get an “installation failed” error during the process. That error sounds worse than it is, because you can avoid it entirely by choosing not to install the startup item included in the MySQL bundle, or, you can just ignore the installation error and start MySQL yourself when you need it. Either way, MySQL actually installs fine, it’s just the bundled startup item that does not function. As you probably guessed, that means you’ll need to start and stop MySQL yourself.
Many developers require MySQL on their Macs, but if you’ve tried to install MySQL in OS X El Capitan and Yosemite, you likely noticed that you’ll get an “installation failed” error during the process. That error sounds worse than it is, because you can avoid it entirely by choosing not to install the startup item included in the MySQL bundle, or, you can just ignore the installation error and start MySQL yourself when you need it. Either way, MySQL actually installs fine, it’s just the bundled startup item that does not function. As you probably guessed, that means you’ll need to start and stop MySQL yourself.
Yes a preference panel gets installed that allows for a GUI approach, but many users prefer to use the command line for this purpose since many of us work in the Terminal anyway, and it has the added possibility of being automated.
Starting, Stopping, Restarting MySQL on Mac OS X
Hre are the three basic commands to start, stop, and restart MySQL in Mac OS X, including OS X El Capitan and OS X Yosemite. Be sure to enter the command onto a single line, sudo obviously requires an administrator password to be entered.
Start MySQL
sudo /usr/local/mysql/support-files/mysql.server start
Stop MySQL
sudo /usr/local/mysql/support-files/mysql.server stop
Restart MySQL
sudo /usr/local/mysql/support-files/mysql.server restart
Of course, these can be combined with starting and stopping Apache server if your intention is to setup a local web development environment.
You can download the latest version of MySQL for Mac OS X here. Future versions of the MySQL installer will undoubtedly fix this for OS X but in the meantime if you get the installation error, either customize the installer and avoid the startup item, or ignore the error and start and stop mysql yourself when it’s needed.
Those interested can also follow a workaround posted to StackOverflow here to automatically load MySQL on boot in OS X El Capitan or Yosemite.
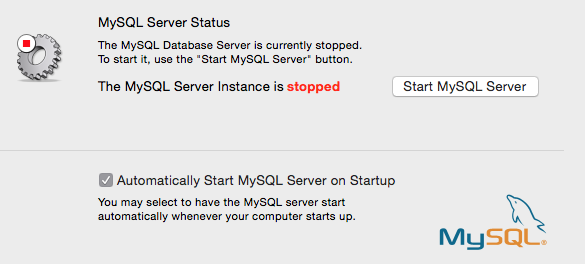
Start, Stop, Restart MySQL from Mac OS Preference Panel
Of course, you can also start and stop the MySQL server from the bundled preference panel. To do that, simply go to the Apple menu and open System Preferences. Choose the “MySQL” preference panel, then click on the “Start MySQL Server” button to start MySQL Server on Mac. If the server is already started, the button will change to “Stop MySQL Server”. If you want to restart the server, simply click to turn it off, wait a minute or so, then turn it back on again. This will be the easy approach for many Mac users, though you’ll have to fiddle with the pref panel as necessary, and if you go that route you’ll want to uncheck the auto-start option because it’s going to fail.

I’m partial to the command line approach for the time being, but use whatever is most appropriate for your situation.
By the way, these mySQL server management methods continue to work in MacOS Sierra as well.
Follow Me:
Top Best Sellers!!


